Scooter Compression Guide

Stunt scooter compression systems are crucial elements in your setup. They ensure a secure connection between your bar, headset, and fork. Whether you're just starting out or have some experience and are seeking a new compression kit, this guide provides an opportunity to grasp the fundamental concepts related to stunt scooter compression.
We will explore the advantages and disadvantages of the most prevalent compression systems and examine their compatibility with other scooter components. By the conclusion, you'll understand which type of compression suits you best and how to maximise the performance of your stunt scooter.
SCS Compression

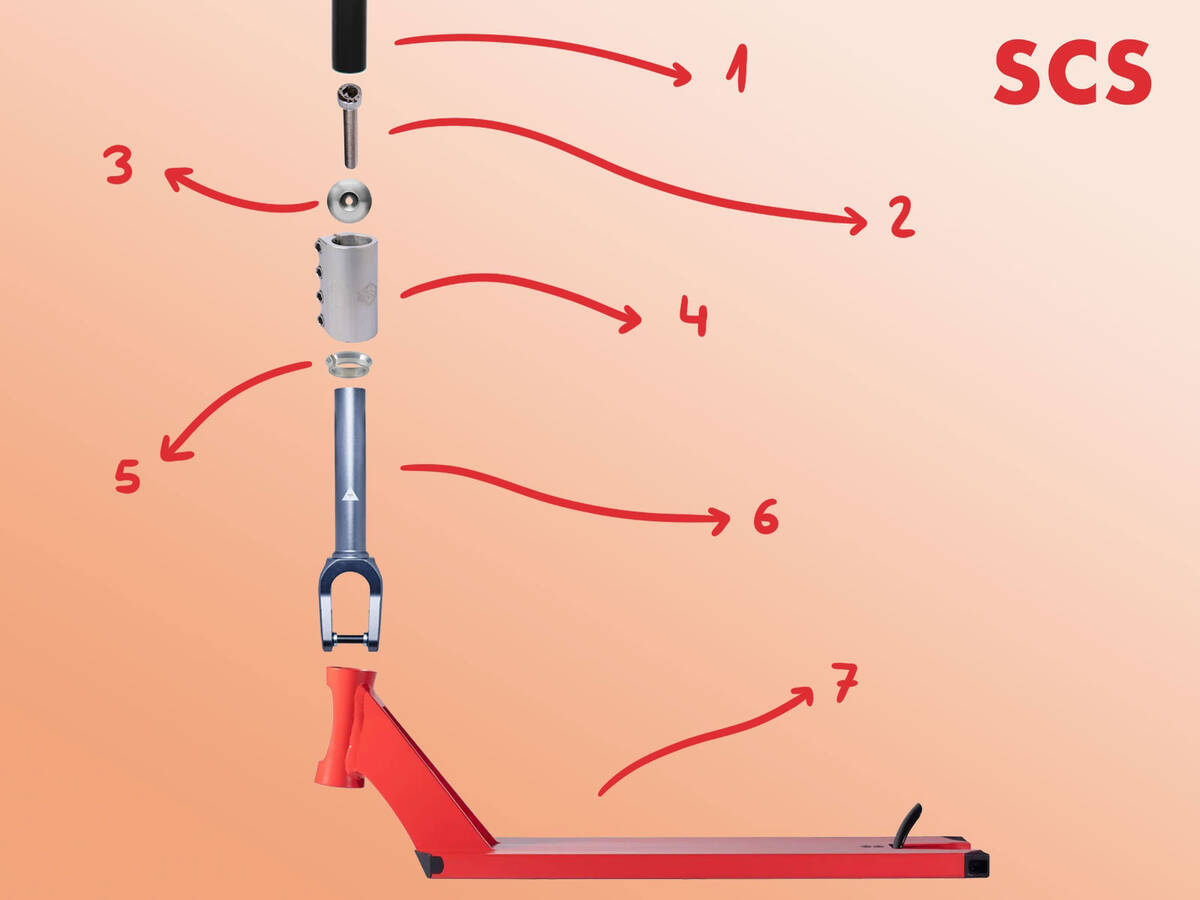
1: Bar (no slit) 2: Compression Bolt 3: Top Cap 4: SCS Clamp 5: C-Ring 6: Fork 7: Deck (headtube & headset)
Standard Compression System, or SCS, is appreciated for its robustness and ease of use, making it the optimal choice for vigorous riding. Although SCS results in a slightly heavier setup, it is likely the most durable compression system available and accommodates both standard and oversized bars, which adds an advantage.
How to Install SCS Compression
The clamp is affixed to the fork via an internal compression bolt paired with a top cap that applies pressure on the inside edge of the clamp. This bolt screws into a starnut or a built-in thread within the fork (most modern SCS forks include built-in threads). The clamp secures the bar and is tightened using four bolts.
View the video below to learn how to install SCS compression:
SCS Compatible Bars
A bar without a slit at the bottom is required for an SCS configuration. If a slit is present, your bar is at risk of breaking since the clamp will merely compress the slit. You can either trim your bar to remove the slit or use an SCS bar adapter to do so.
SCS Compatible Clamps
In SCS, the compression system is integrated into the clamp, necessitating an SCS-specific clamp. Ensure the clamp's inner diameter matches the outer diameter of your bars—either standard 32 mm or oversized 35 mm.
Notice: If the inner edge of the SCS clamp does not exceed the top of the fork, achieving a proper connection between the clamp and fork is impossible. To overcome this, a headset spacer can be used to elevate the clamp's position.
SCS Compatible Forks
Both HIC and SCS forks can be used with SCS compression, with no distinction between them regarding compatibility.
HIC Compression

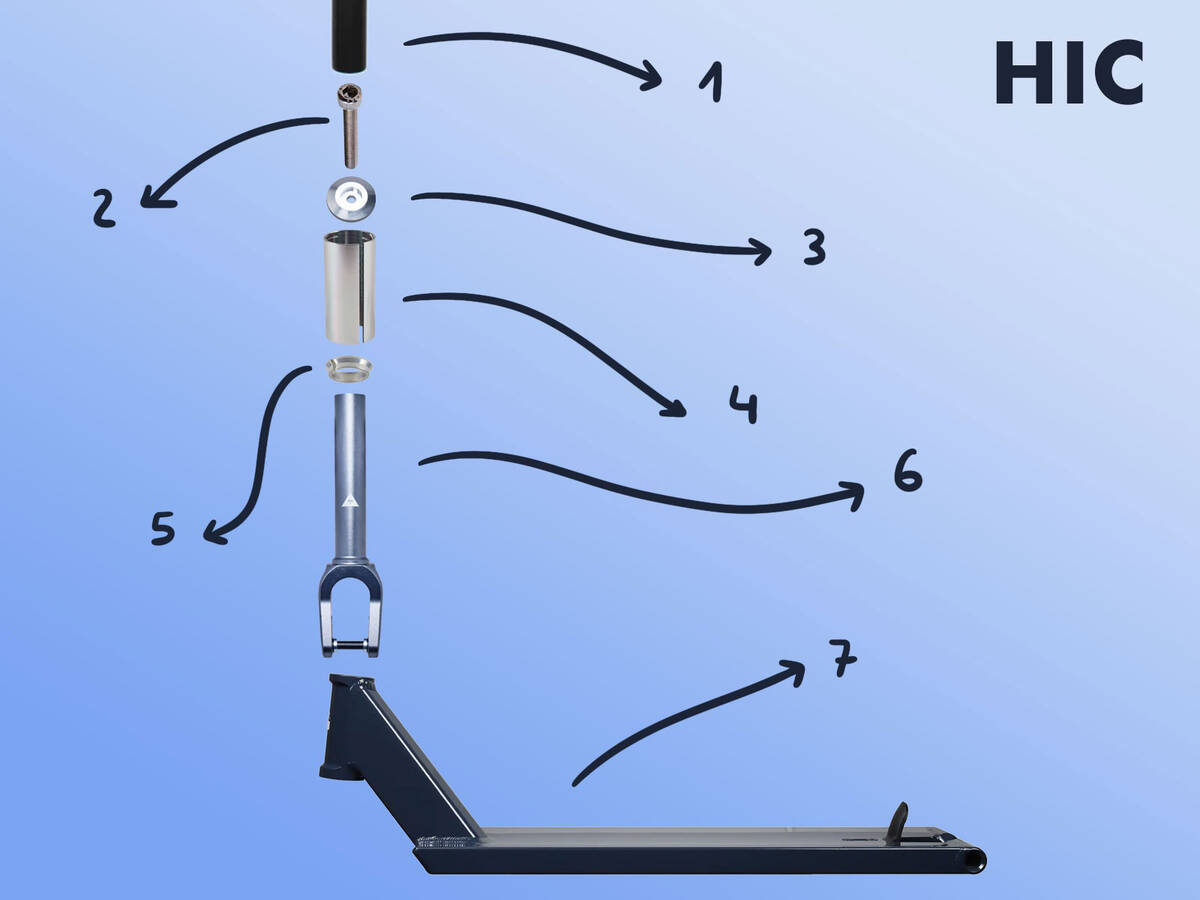
1. Bar 2. Compression Bolt 3. Top Cap 4. IHC Shim 5. C-Ring 6. Fork 7. Deck (headtube & headset)
Hidden Internal Compression, or HIC, is not the lightest option, but it is preferred for being lighter than SCS and relatively easy to assemble. However, HIC necessitates a slit-included bar, creating a vulnerability absent in heavier SCS compression.
How to Install HIC Compression
An HIC shim is positioned onto the fork, while a compression bolt with a top cap ensures the shim is pressed down onto the deck's headtube, securing the fork. A clamp then fastens the bar to the fork's tube.
Watch how the components of an HIC system are assembled in the video below:
HIC Compatible Bars
HIC bars, boasting an internal diameter of 32 mm and an external diameter of 35 mm, are crafted from durable materials like steel or titanium. Aluminum bars have an oversized outer diameter but a narrower internal diameter due to the requirement for thicker tubing for shredding. Consequently, aluminum bars are unsuitable for an HIC setup. HIC bars incorporate a slit at the base.
HIC Compatible Clamps
The HIC clamp should encompass the entire slit in your bar. Select a clamp with a 35 mm (oversized) inner diameter for an HIC setup.
HIC Compatible Forks
HIC/SCS forks are suitable for HIC compression systems.
Note: To address this, use an HIC spacer before applying the shim to the fork, which is crucial for effective compression and tightening of your setup.
IHC Compression

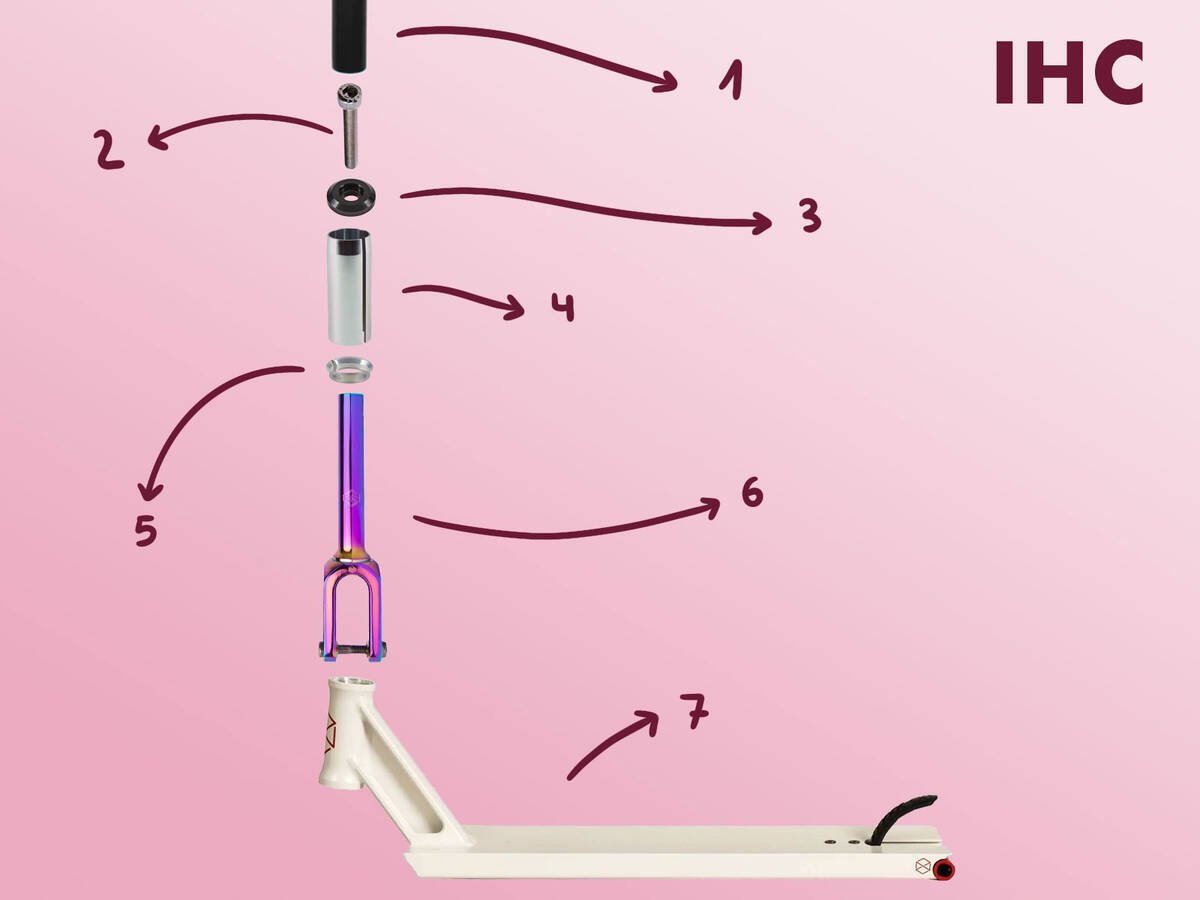
1. Bar 2. Compression Bolt 3. Top Cap 4. IHC Shim 5. C-Ring 6. Fork 7. Deck (headtube & headset)
Internal Hidden Compression, known as IHC, shares many features with HIC, but one of its main benefits is the ability to create a lightweight setup with dependable compression.
The primary distinction between IHC and HIC is that IHC forks have a slimmer shaft or fork tube. This allows IHC forks to be compatible with bars with a 28 mm internal diameter, accommodating aluminum bars with a 28 mm internal and 35 mm external diameter.
How to Install IHC Compression
Within the headset bearing, an IHC compression ring is installed to accommodate the narrower fork tube, eliminating any movement or slack between the fork and headset bearing.
Following this, you should place an IHC shim onto the fork tube, with a top cap placed on the shim. The compression bolt is then threaded into the fork and, when tightened, exerts pressure on the top cap to establish compression.
See the video below to observe how to set up IHC compression:
IHC Compatible Bars
IHC is suitable for all bars with a 28 mm internal diameter (standard) and a slit at the base.
IHC works with all bars having a 28 mm standard inner diameter and a bottom slit.
If you choose an oversized steel or titanium bar for an IHC fork, an adapter is necessary to fit the larger internal diameter.
IHC Compatible Clamps
Check that the clamp's internal diameter aligns with your bar's external diameter.
IHC Compatible Forks
IHC forks are vital for IHC compression setups. They possess thin shafts to cut down on weight, and unlike HIC, an IHC fork is compatible with bars having a normal internal diameter of 28 mm.
Note: Ensure the IHC shim extends beyond the section of the fork tube protruding from the headtube. Failing this, proper compression won't be achieved. Use a headset spacer when necessary to allow correct tightening.
ICS Compression
Inverted/Internal Compression System, or ICS, is noted for being lightweight and cost-effective, with minimal parts required for fitting.
The downsides of ICS mainly concern the challenges associated with its installation and upkeep. While it appeals to park riders with excellent landing control due to its lightweight nature, ICS doesn't match the durability of SCS.
How to Install ICS Compression
For ICS, a bolt is inserted through the fork from below. The protruding end of the compression bolt is threaded into a starnut within the bar. ICS requires fewer components compared to other systems.
Its installation and maintenance can prove cumbersome. To adjust the compression bolt, you need to remove the front wheel. For instance, if you wish to take out the bar, you need to remove the front wheel and fully loosen the compression bolt.
Watch the video below to understand how to install ICS compression:
ICS Compression Bars
ICS compression depends on a starnut to secure itself inside the bar. For most steel and titanium bars, the surface is smooth and hard, making starnuts susceptible to sliding and potentially loosening compression. Aluminum is softer, allowing starnuts to grip more effectively.
As such, we suggest using either an aluminum bar or a bar with a permanently integrated starnut for ICS compression.
ICS bars generally have a 28 mm internal diameter with a slit at the bottom, similar to IHC and HIC bars. The external diameter ranges from 32 mm to 35 mm, so ensure your clamp's internal diameter matches your bar's external diameter.
ICS-10 Compression
ICS-10 is akin to standard ICS, differing only in the compression bolt's thread size.
ICS-10 employs bolts with M10 thread, while regular ICS uses M6 threads.
The more robust M10 bolts offer greater durability than the slimmer M6 bolts.
The video below demonstrates the installation of ICS-10 compression:
Compression Systems Video Explainer
Explore this explainer video filled with expert knowledge on scooter compression. Learn about SCS, HIC, IHC, and ICS-10 systems in this video.
